1
00:00:02,133 --> 00:00:04,366
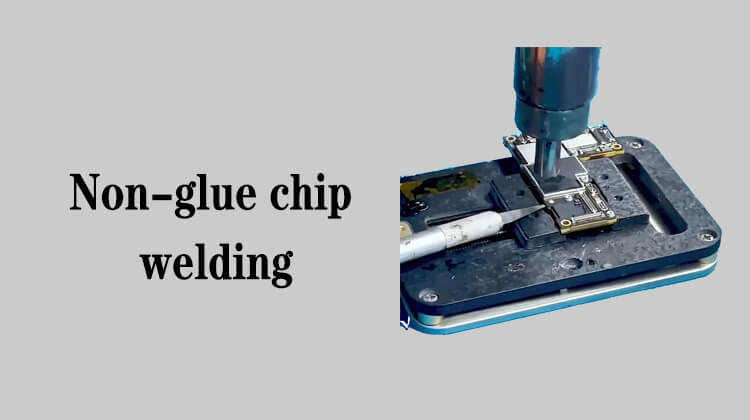
Now let's learn how to disassemble
2
00:00:08,566 --> 00:00:10,200
Straight-air hot gun
3
00:00:12,466 --> 00:00:14,933
Temperature to 450 degrees
4
00:00:15,566 --> 00:00:17,733
Adjust the air volume to the maximum
5
00:00:20,666 --> 00:00:23,300
Best to use this 4mm medium nozzle
6
00:00:27,466 --> 00:00:30,300
First, we put the tweezers under the chip
7
00:00:32,133 --> 00:00:34,533
Keep the tweezers as low as possible
8
00:00:36,066 --> 00:00:38,100
Do not angle the tweezers too much
9
00:00:38,400 --> 00:00:39,500
If it's too much
10
00:00:39,600 --> 00:00:44,633
When picking the chip later, it is easy to push the chip in the opposite direction
11
00:00:44,866 --> 00:00:47,700
It is easy to distort the surrounding components
12
00:00:48,066 --> 00:00:50,800
So we try to keep the rear a little lower
13
00:00:51,066 --> 00:00:54,833
When twisting the tweezers, it picks up from bottom to top
14
00:00:56,333 --> 00:00:59,466
You can also use the method we just mentioned to pry
15
00:01:00,500 --> 00:01:01,500
It's up to you
16
00:01:06,000 --> 00:01:08,766
I generally like to pick in this direction
17
00:01:10,100 --> 00:01:15,833
In the process of disassembly, the straight-air gun is best to point to the chip vertically
18
00:01:16,300 --> 00:01:21,000
The lower edge of the nozzle is about 1-2 mm away from the chip
19
00:01:22,466 --> 00:01:27,766
Don't be too high, otherwise it will easily melt the surrounding components
20
00:01:29,066 --> 00:01:32,466
Another thing is that we're working under the microscope now
21
00:01:35,800 --> 00:01:37,633
The microscope is right above
22
00:01:38,166 --> 00:01:41,933
So when we disassemble, we have to tilt the nozzle a little bit
23
00:01:43,166 --> 00:01:46,100
Because I need to work under the microscope to show you
24
00:01:46,533 --> 00:01:51,133
For normal maintenance, I may put it directly on the desktop to blow
25
00:01:54,000 --> 00:01:56,900
After the tweezers are placed, blow
26
00:01:57,100 --> 00:01:59,633
Do not poke with tweezers while blowing
27
00:02:00,000 --> 00:02:04,966
Sometimes the tin has melted and it is easy to touch the side
28
00:02:05,233 --> 00:02:08,400
When the tweezers are ready, move the nozzle over
29
00:02:08,900 --> 00:02:10,766
Lower it as possible as you can
30
00:02:11,133 --> 00:02:12,466
Pick it while blowing
31
00:02:12,766 --> 00:02:15,600
Pick this chip off as soon as the tin melts
32
00:02:20,600 --> 00:02:23,933
How can I know if the disassembly temperature is suitable?
33
00:02:24,666 --> 00:02:27,366
Just look at the solder joints on the motherboard
34
00:02:29,133 --> 00:02:36,566
We have now observed that more than 80% of all the solder joints under the disassembled chip are in this very flat state
35
00:02:42,000 --> 00:02:45,400
Just when the tin was a little soft, we picked up the chip
36
00:02:46,933 --> 00:02:53,633
If it is disassembled, most of the pins under the chip are in the sharp state that my tweezers are pointing at
37
00:02:59,500 --> 00:03:04,400
It means that the nozzle has been blowing this area for too long when it was dismantled
38
00:03:06,600 --> 00:03:08,133
And the temperature was high
39
00:03:08,400 --> 00:03:12,266
If so, it is easy to distort the surrounding components
40
00:03:13,400 --> 00:03:23,166
The second is that the small components with glue or chips that are relatively close to the periphery of the motherboard are prone to be tin extruded
41
00:03:23,966 --> 00:03:29,366
Missing soldering or internal tin extrusion,short bridge and short circuit
42
00:03:29,500 --> 00:03:33,533
The back of the motherboard, like the motherboard of our mobile phone
43
00:03:34,600 --> 00:03:37,800
Basically, components are mounted on both sides
44
00:03:38,700 --> 00:03:41,833
The chip we are soldering now has a hard drive on the back
45
00:03:44,066 --> 00:03:47,066
The hard disk is also this kind of chip with glue
46
00:03:47,300 --> 00:03:52,733
In the case of blowing for a long time, the hard disk on the back is easy to short-circuit
47
00:03:53,100 --> 00:03:57,100
Therefore, the temperature we disassemble must be well controlled
48
00:04:01,100 --> 00:04:03,433
Then we disassemble a chip in another way
49
00:04:04,666 --> 00:04:05,966
Pick from the bottom
50
00:04:07,933 --> 00:04:09,566
Temperature remains the same
51
00:04:24,100 --> 00:04:24,666
Done
52
00:04:26,900 --> 00:04:30,766
The heating time of this chip is a little longer than the one we just removed
53
00:04:39,300 --> 00:04:43,700
Now this chip has more than half of the solder joints in a melted state
54
00:04:45,666 --> 00:04:48,533
The individual solder joints still haven't melted
55
00:04:48,733 --> 00:04:51,600
But there is no probem with this
56
00:04:51,700 --> 00:04:54,966
It's all about the sign of melting of the solder joints
57
00:04:55,000 --> 00:04:56,200
If all melted
58
00:04:56,333 --> 00:04:58,466
There might be a problem on the back
59
00:04:58,600 --> 00:05:00,366
Or the surrounding places
60
00:05:01,100 --> 00:05:02,966
The is the disassembly method