1
00:00:03,466 --> 00:00:06,399
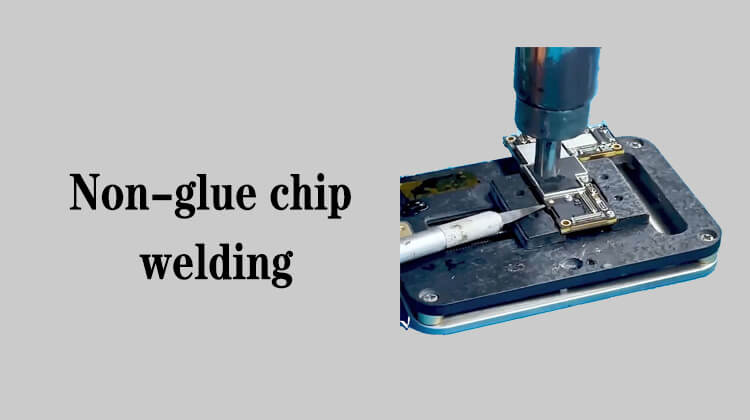
next we will deal with the residual cutter
2
00:00:06,400 --> 00:00:08,166
on the surface of the chip
3
00:00:08,766 --> 00:00:11,666
we use the card slot of the professional chip
4
00:00:11,666 --> 00:00:13,933
clip on the edge of the fixture
5
00:00:16,733 --> 00:00:18,966
put the chip on this cart slot
6
00:00:19,200 --> 00:00:21,900
then push the slider to clamp the chip
7
00:00:25,166 --> 00:00:26,299
after clamping
8
00:00:26,666 --> 00:00:29,899
add some suttery paste to the surface of the chip
9
00:00:30,866 --> 00:00:33,766
the suttering iron quickly flatten on it
10
00:00:35,733 --> 00:00:37,466
pick it up when you're done
11
00:00:37,533 --> 00:00:40,166
don't let the suttering iron stay on the surface
12
00:00:40,166 --> 00:00:41,899
of the chip all the time
13
00:00:42,866 --> 00:00:45,733
it's the suttering iron touches the chip for more than
14
00:00:45,733 --> 00:00:47,466
2 or 3 seconds
15
00:00:47,733 --> 00:00:50,566
the chip may be damaged by high temperature
16
00:00:50,966 --> 00:00:53,566
therefore when we flatten the sutter
17
00:00:53,566 --> 00:00:56,866
the sutter iron must be flattened on it quickly
18
00:00:56,866 --> 00:00:58,733
and not stop on it
19
00:00:59,300 --> 00:01:01,866
this is one of the flattening methods
20
00:01:02,000 --> 00:01:03,600
let's learn another one
21
00:01:03,933 --> 00:01:07,533
the other is to directly use a strange to add flux
22
00:01:07,700 --> 00:01:10,066
and use the needle to press the chip
23
00:01:10,066 --> 00:01:11,733
and flatten it quickly
24
00:01:12,100 --> 00:01:13,733
adjust the direction
25
00:01:17,133 --> 00:01:17,933
done
26
00:01:19,166 --> 00:01:22,166
the surface of the chip does not need to be flattened
27
00:01:22,166 --> 00:01:23,866
with the disardering wig
28
00:01:23,866 --> 00:01:25,099
like the motherboard
29
00:01:26,166 --> 00:01:28,399
because we still need to rebult later
30
00:01:28,666 --> 00:01:31,199
there is no need to flatten the sutter joint
31
00:01:31,200 --> 00:01:33,266
to make it particularly flat
32
00:01:33,566 --> 00:01:36,166
as long as the sutter joint is not larger
33
00:01:36,166 --> 00:01:37,966
than the opening of the stencil
34
00:01:38,500 --> 00:01:40,300
just to flatten it little
35
00:01:40,666 --> 00:01:44,466
then we use a dusty free cloth dipped in PCB cleaner
36
00:01:44,466 --> 00:01:45,599
to clean the chip
37
00:01:45,966 --> 00:01:47,533
pretty much like this
38
00:01:47,900 --> 00:01:50,733
then write it in this dusty free cloth
39
00:01:50,966 --> 00:01:52,799
continue to wash with it
40
00:01:53,300 --> 00:01:55,733
change to a clean dusty free cloth
41
00:01:57,933 --> 00:01:59,699
chips must be cleaned
42
00:02:00,466 --> 00:02:02,899
otherwise any dirt on the solder
43
00:02:02,900 --> 00:02:05,366
joints will cause the reballing to fail
44
00:02:06,866 --> 00:02:09,599
dip the brush with PCB cleaner
45
00:02:09,800 --> 00:02:12,400
and clean it with dust free cloth
46
00:02:17,300 --> 00:02:20,000
well the chip has been washed the clean