1
00:00:02,766 --> 00:00:04,866
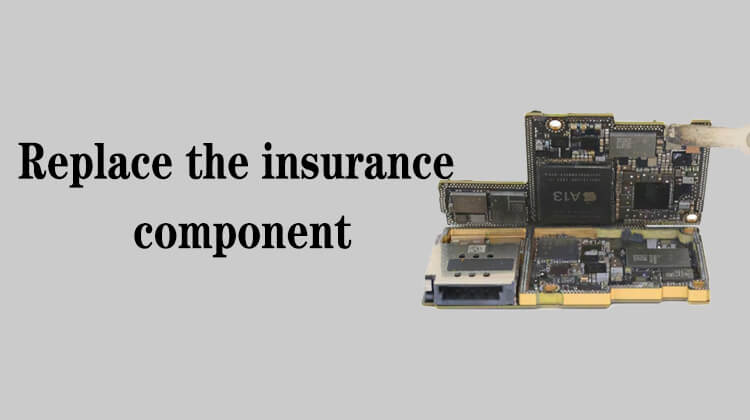
Same fault as last video
2
00:00:05,566 --> 00:00:07,233
Loose insurance components
3
00:00:07,800 --> 00:00:10,133
We can also use another method to repair
4
00:00:10,766 --> 00:00:13,666
At this time we need to use a soldering iron
5
00:00:14,166 --> 00:00:17,766
We first use a soldering iron to remove the loose components
6
00:00:20,333 --> 00:00:23,933
Use a soldering iron to heat the solder joints and tinning
7
00:00:28,266 --> 00:00:29,400
Two solder joints
8
00:00:29,633 --> 00:00:32,900
Dip some medium melt solder on the tip of the soldering iron
9
00:00:33,400 --> 00:00:35,100
This will make it rounded
10
00:00:36,933 --> 00:00:39,533
After making sure there is solder on it
11
00:00:40,066 --> 00:00:42,266
Let's cut a piece of desoldering wick
12
00:00:46,266 --> 00:00:51,733
Then separate a pinch of copper wire in the desolder wick from the inside to separate it
13
00:00:54,300 --> 00:00:59,933
Then use a scalpel to cut off the bent position at the front of the separated copper wire
14
00:01:00,666 --> 00:01:02,066
Make the front straighter
15
00:01:03,533 --> 00:01:07,900
At this time, we use this copper wire to connect the insurance component
16
00:01:11,400 --> 00:01:16,100
Put the copper wire to the right of the solder joint on the side farther from us
17
00:01:16,866 --> 00:01:20,533
Because most people hold a soldering iron in their right hand
18
00:01:20,900 --> 00:01:23,833
Then push it from right to left with the soldering iron
19
00:01:24,100 --> 00:01:27,666
In this way, the copper wire is soldered to a solder joint
20
00:01:28,266 --> 00:01:32,033
Then put the copper wire on the side close to us on the solder joint first
21
00:01:32,300 --> 00:01:33,800
Heat with a soldering iron
22
00:01:34,000 --> 00:01:35,566
Melt the solder underneath
23
00:01:37,200 --> 00:01:40,566
This copper wire is connected to the two solder joints now
24
00:01:40,833 --> 00:01:43,066
Then cut this copper wire with a blade
25
00:01:45,700 --> 00:01:46,866
Clean with the brush
26
00:01:49,133 --> 00:01:51,466
We mainly demonstrate the method of connection
27
00:01:53,033 --> 00:01:57,366
The component I disassembled is not necessarily an insurance inductor
28
00:01:57,800 --> 00:02:01,633
Both sides of the solder joints are grounded like the bottom side
29
00:02:02,666 --> 00:02:04,633
It dissipates heat very fast
30
00:02:05,500 --> 00:02:08,933
This leads to the less rounded soldering of the solder joint
31
00:02:09,033 --> 00:02:10,366
But it's solidified
32
00:02:12,666 --> 00:02:14,966
We mainly observe the method of welding
33
00:02:16,133 --> 00:02:18,866
I just randomly dismantled a component
34
00:02:20,333 --> 00:02:22,533
This is how to connect with a soldering iron
35
00:02:22,666 --> 00:02:24,266
We have other ways to obeserve
36
00:02:25,666 --> 00:02:27,500
Burn this with a soldering iron
37
00:02:30,133 --> 00:02:34,200
Also, there should be a little bit of solder on the solder joints
38
00:02:34,366 --> 00:02:36,933
There is a little solder on both solder joints
39
00:02:37,300 --> 00:02:38,900
Still use copper wire
40
00:02:41,233 --> 00:02:44,066
We will directly disassemble it on the motherboard
41
00:02:44,900 --> 00:02:46,566
This can be more accurate
42
00:02:49,700 --> 00:02:52,533
Cut off the one that sticks to the dirty stuff at the top
43
00:02:55,100 --> 00:02:56,133
Get rid of it
44
00:02:59,466 --> 00:03:01,200
Then place it near the component
45
00:03:04,733 --> 00:03:07,666
Use a blade to cut a piece about the size of the component
46
00:03:12,733 --> 00:03:13,633
Put it aside
47
00:03:18,000 --> 00:03:19,600
Let's adjust the direction
48
00:03:22,333 --> 00:03:23,933
It's easier to operate
49
00:03:24,233 --> 00:03:25,500
Straight-air gun
50
00:03:25,700 --> 00:03:28,800
450 degrees with maximum air volume
51
00:03:28,966 --> 00:03:33,100
Hold the copper wire with tweezers and place it on the two pins of the component
52
00:03:33,200 --> 00:03:35,000
Then blow it with a hot air gun
53
00:03:35,600 --> 00:03:36,566
Blow and leave
54
00:03:36,733 --> 00:03:37,866
Repeat doing that
55
00:03:45,166 --> 00:03:48,700
It is obvious to see that the solder is wrapped on the copper wire
56
00:03:51,200 --> 00:03:52,466
So we're done welding
57
00:03:58,166 --> 00:04:00,766
The excess on both sides can be cut off
58
00:04:06,033 --> 00:04:09,066
Dip the brush into the PCB cleaner to clean it
59
00:04:16,200 --> 00:04:23,266
The solder joints that are repaired in this way will look more perfect than the second one we repaired with a soldering iron
60
00:04:27,866 --> 00:04:32,466
This is our repair method when our insurance components are loose or damaged