1
00:00:03,366 --> 00:00:04,333
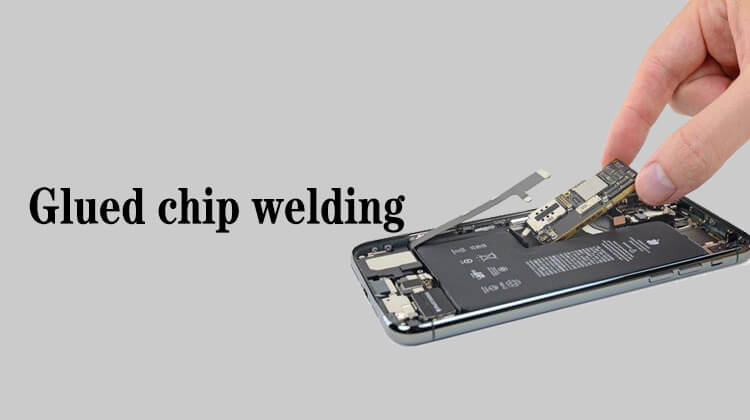
Hello,everyone
2
00:00:05,166 --> 00:00:10,233
Today, I will explain to you how to disassemble and weld the glued chip on the motherboard
3
00:00:11,200 --> 00:00:18,133
Through observation, the black glue can be clearly seen in the gap between the glued chip and the surrounding components
4
00:00:18,300 --> 00:00:19,800
We call it a glued chip
5
00:00:21,100 --> 00:00:25,466
We need to use some tools in the process of disassembling this kind of chip
6
00:00:26,466 --> 00:00:31,766
The first is to separate the residual glue in the gap between the chip and the surrounding components
7
00:00:32,533 --> 00:00:35,433
This tool is called the edge glue knife
8
00:00:36,766 --> 00:00:39,533
What I'm holding right now is an edge glue knife
9
00:00:40,366 --> 00:00:42,400
It's a metal piece of iron
10
00:00:43,066 --> 00:00:45,100
Then make the front position thinner
11
00:00:46,000 --> 00:00:49,733
Then use this thin sheet to cut back and forth in the gap
12
00:00:49,933 --> 00:00:50,966
To cut the glue
13
00:00:51,466 --> 00:00:54,233
The newly bought blade may be slightly thicker
14
00:00:54,766 --> 00:00:56,166
We need to sand the front
15
00:00:56,900 --> 00:00:58,800
This is a new one I bought back
16
00:01:01,466 --> 00:01:03,066
I need to sand the front part
17
00:01:05,700 --> 00:01:08,000
When I bought it, the front was thicker
18
00:01:08,433 --> 00:01:09,300
To thin it
19
00:01:10,300 --> 00:01:14,900
Let's compare these two, one polished and the other unpolished
20
00:01:15,633 --> 00:01:18,466
The thickness of the back is basically the same
21
00:01:20,533 --> 00:01:23,466
Then the sharp point in the front has been polished
22
00:01:25,566 --> 00:01:27,533
It's narrowed on both sides
23
00:01:29,400 --> 00:01:34,700
After grinding, the sharp point in the front should also be rounded a little bit
24
00:01:35,200 --> 00:01:38,466
Like mine, the front tip has been smoothed
25
00:01:38,700 --> 00:01:40,966
It is not easy to scratch the motherboard
26
00:01:41,600 --> 00:01:43,100
This is the first knife
27
00:01:44,100 --> 00:01:46,400
The second tool is for chip removal
28
00:01:47,000 --> 00:01:48,266
The chip is glued
29
00:01:48,966 --> 00:01:54,766
It can't be picked up with tweezers after blowing directly like the ordinary glue-free chips
30
00:01:55,100 --> 00:01:56,633
After we blow this chip
31
00:01:57,000 --> 00:02:00,766
Put a thin piece of metal in the gap between the chip and the motherboard
32
00:02:01,500 --> 00:02:04,266
After putting it in, twist the handle
33
00:02:04,733 --> 00:02:06,200
Or just lift it up
34
00:02:06,566 --> 00:02:07,833
To pry up this chip
35
00:02:08,366 --> 00:02:12,366
At this time, you need to use a knife like this to pry the chip
36
00:02:13,066 --> 00:02:16,000
This is what the knife looked like when I bought it
37
00:02:16,466 --> 00:02:18,566
Grind the front to an arc angle
38
00:02:19,866 --> 00:02:21,633
Grind it on the sandpaper
39
00:02:22,066 --> 00:02:23,100
Round the front part
40
00:02:23,600 --> 00:02:24,566
As for the edge
41
00:02:25,466 --> 00:02:27,733
The edge of the new blade is very sharp
42
00:02:28,233 --> 00:02:30,533
And there may be some burrs on the edges
43
00:02:31,433 --> 00:02:34,033
We also need to smooth this burr on this edge
44
00:02:35,066 --> 00:02:36,633
This is a grinded one
45
00:02:37,633 --> 00:02:39,000
Let's look at the front
46
00:02:40,366 --> 00:02:41,666
Relatively round
47
00:02:42,600 --> 00:02:43,700
So is the edge
48
00:02:44,433 --> 00:02:48,200
Just grind back and forth on the sandpaper a few times
49
00:02:49,966 --> 00:02:58,533
Another one is that after the chip is removed, it is necessary to clean up the glue remaining on the motherboard and the glue remaining on the chip
50
00:02:59,533 --> 00:03:01,400
We're going to use a glue scraper
51
00:03:02,266 --> 00:03:05,300
The glue scraper uses No.16 knife blade
52
00:03:06,433 --> 00:03:08,800
This is a new No.16 cutter blade
53
00:03:09,433 --> 00:03:10,433
Then grind it
54
00:03:11,933 --> 00:03:13,833
Narrow this area of the blade
55
00:03:16,166 --> 00:03:18,066
Narrow the area I'm pinching now
56
00:03:18,433 --> 00:03:23,266
Then blunt the tough edge in front of the knife which you can see a small beveled edge
57
00:03:26,866 --> 00:03:30,100
Round the tip that is in contact with the chip at the front
58
00:03:32,800 --> 00:03:36,700
The tip of the back part in contact with the chip should also be rounded
59
00:03:38,333 --> 00:03:39,500
After grinding
60
00:03:40,566 --> 00:03:42,566
The finished state is like this
61
00:03:43,300 --> 00:03:44,333
One is narrowed
62
00:03:45,833 --> 00:03:49,533
The other is that the pointed position in the front is rounded
63
00:03:51,266 --> 00:03:53,400
The position of the rear is rounded
64
00:03:54,633 --> 00:03:57,033
These are the three knives we need to use
65
00:03:58,500 --> 00:04:00,066
No.16 glue scraper
66
00:04:00,633 --> 00:04:02,400
This is the edge glue knife
67
00:04:03,166 --> 00:04:04,933
There's also a chip knife